

How To Do Camera Zoom In Clip Studio Paint
Using shortcuts on Clip Studio Paint or whatever other software while drawing is very common. It makes everything faster and we don't need to break our period to go find the tool we need.
Sometimes shortcuts modify from software to software. Other times I just don't like the shortcut assigned, and so I demand to alter them. In Prune Studio you can edit, delete and fifty-fifty add new shortcuts as yous wish, which tin can be very useful!
If yous're new to Clip Studio Pigment or tin can't discover a specific shortcut, I fabricated a listing of the most used shortcuts both for drawing and animating. Some of them yous might already know since they're very common and the same as in other drawing software. Others will accept different keybindings prepare to them. So keep on reading to check them out and learn what each of these shortcuts does!
Clip Studio Paint Shortcuts To Speed Up Your Workflow
While drawing on any software, information technology's always useful to know some shortcuts. Having to move your mouse or pen to each specific button on your toolbar or other menus is too time-consuming. Sometimes it even feels like it breaks the flow of your work.
While drawing, hitting the "P" or "B" push button on your keyboard, so y'all alter to the pen tool or brush tool, accordingly is much faster and automatic for united states of america. This way y'all don't demand to stop drawing and think where do yous need to become to change tools.
When you know your shortcuts, it's very intuitive and y'all won't even pause to call up which buttons do you lot need to push. You lot just exercise them without thinking.
I've gathered some of the well-nigh common shortcuts that yous tin use on Prune Studio Paint. Some of them you'll use a lot, others non so much simply information technology's always skillful to know of them!
| Shortcut Names | Keybinds / Hotkeys |
| Zoom In | Ctrl+ or Ctrl+Infinite |
| Zoom Out | Ctrl- or Alt+Space |
| New Layer | Ctrl+Shift+N |
| Brush Tool | B |
| Pen Tool | P |
| Increase Castor Size | ] |
| Reduce Castor Size | [ |
| Re-create | Ctrl+C |
| Paste | Ctrl+5 |
| Cut | Ctrl+X |
| Eraser Tool | Eastward |
| Rotate | R |
| Eyedropper | I |
| Fill Tool | Grand |
| Disengage | Ctrl+Z |
| Transform | Ctrl+T |
| Flip | None, y'all demand to add your own! (explained below) |
| Select All | Ctrl+A |
| Deselect | Ctrl+D |
| Movement Layer Tool | G |
| Hand Tool | H |
- Zoom: Zooming in and out is something you're probably doing all the time. I do at to the lowest degree. While drawing, we need to bring certain parts closer to united states of america to nail down the details as nosotros want. But we also need to see the whole picture one time in a while to check if everything is alright. The most common shortcut to use Zoom In is Ctrl+, but in Clip Studio Pigment, you can likewise press Ctrl+Space and and then click the left button of your mouse as much as you need until you lot're as close as yous need. Personally, I prefer to apply Ctrl+. Information technology feels more intuitive and easier, merely everyone has their own preferences!
- New Layer: You can create different kinds of new layers in Clip Studio Paint. The about common to use is Raster Layer and Vector Layer. To create a new Raster Layer but press Ctrl+Shift+N and it will appear correct away. If you want to create a Vector, Fill, Gradient or some other kind of layer using a shortcut, you have to input information technology yourself. Subsequently this mail service, I'one thousand going to explain better how to change or add together your ain shortcuts on Clip Studio Pigment, just for now, let'south see what exists already! Personally, I utilize Raster and Vector Layers a lot, but I barely utilise the shortcut, since the buttons are at hand right at the acme of the layer window.
- Brush Tool: To use a brush tool, you simply press 'B'. It is worth to mention that several types of brush tools are assigned to this push. If you press the 'B' button once it will go to the mutual brushes tab. Pressing it a second time, y'all'll go to the airbrush tab. Press information technology a third time, it volition change it to the decoration brushes tab. This is very useful if yous tend to roam through all of these while working!
- Pen Tool: If you work with line art or inking, the pen tool is the 1 you'll utilize the well-nigh. I use my pen tool more frequently than a castor. Of course, this changes from artist to artist. We all have different ways of working and like to utilize different tools. To utilise the Pen Tool in Clip Studio Pigment, only printing 'P' on your keyboard. A small note though, there'due south more than one Subtool in the Pen category. If you hitting 'P' once, it will show you all the inking pen brushes you accept. Hitting a 2d time the software volition move you to the Pencil category. This might sound weird at first, but it'south actually quite useful if y'all tend to utilize both. I usually sketch everything with a pencil castor outset and and so motion to pen brushes, depending on what I'm drawing and this fashion, the shortcut is pretty handy!
- Increase Castor: Ok, I'k going to be honest here. I never liked how in most drawing software increasing and decreasing the castor size has such a difficult shortcut to reach. To increase your brush size you lot demand to press ']' on your keyboard. For me, to do this I take to striking Ctrl+Alt+9. That's simply likewise many buttons to remember all the time. If it sounds and works well for you, then proficient, leave it as it is. If you're not a fan of it, change it to something easier for you. Personally, I just assigned them to buttons on my drawing tablet. Information technology's easier to reach than the keyboard. Merely cull anything as long every bit it'south intuitive and comfortable for you!
- Reduce Castor: If you demand to reduce your castor size, Clip Studio Paint assigned information technology to the '[' on the keyboard. Again, I recommend irresolute this to something easier if y'all don't like information technology. If this is a button that is easy to accomplish on your keyboard, then information technology'due south fine! Any shortcut can be inverse to your ain preferences.
- Copy: This one is pretty straightforward. Lucky for united states a lot of shortcuts are very universal, meaning they're the same most in whatever software. And so if you want to copy something, simply select what you desire and printing 'Ctrl+C' and that's it!
- Paste: Same case equally before, you've copied what you demand and now yous take to paste it somewhere. Well, the shortcut is the same that you're probably already used to 'Ctrl+5'. But remember to be certain you're pasting it in the right layer. We don't want to disorganize everything in our drawings!
- Cut: If you paste something in the wrong layer or y'all just want to move a part of the drawing to another layer, this is very easy to do! Only select what you need to cutting out, and so press 'Ctrl+Ten' this volition cut that part of the drawing. Now you simply need to Paste information technology. Usually, when pasting something yous just cut, Clip Studio Paint will create a new layer with it!
- Eraser Tool: Another tool nosotros'll be using constantly. Clip Studio Paint has assigned the Eraser Tool to a very intuitive button, just press 'E' and it will modify from pen or brush to an eraser and its tab will be visible so you can choose what kind of eraser you demand.
- Rotate: This is something I actually employ a lot. While drawing sometimes I tin can't get a line as I desire considering I tin can't position myself properly. So I need to rotate my canvas. To do so but printing the 'R' button on your keyboard then just utilise the mouse to turn the canvass!
- Eyedropper: Another very useful tool. I constantly pick colors that I demand to re-use. To change your tool to the Eyedropper, simply printing 'I'. Although this is something I barely use. If you're using the pen or brush and you lot need to pick a color, you tin can just press 'Alt' and every bit long as you're pressing the push button, the software will change your tool to the eyedropper. From in that location simply pick the color you want and release the 'Alt' button. At present yous're back with your brush and can continue to pigment!
- Fill Tool: To use the pigment bucket or the slope tool, only press 'Thou' on your keyboard. I use the pigment saucepan a lot to add together the base colors to my drawings, and then this is very useful. When pressing 'G' the commencement fourth dimension, it volition kickoff prove you the Gradient tab and pressing the button a second time, you'll go to the paint bucket tool.
- Undo: The ane shortcut that anybody loves! Undo is our all-time friend and everyone already knows information technology past heart. Even when working traditionally I feel myself trying to press my and so familiar 'Ctrl+Z' buttons! Even though it has a very common and simple shortcut is also very useful to add an Undo shortcut to your tablet or pen keys.
- Transform: We oft need to resize, flip or rotate something in our drawings, so the transform shortcut is as well right at the tip of my fingertips also. 'Ctrl+T' and the cartoon or the option y'all've made is set up to exist transformed!
- Flip: If you flip your work a lot, fifty-fifty if information technology'southward just to check on the proportions, Clip Studio Paint doesn't accept a shortcut assigned. I usually merely press the flip button that appears on the tab when using Transform. But if you feel that'southward counterproductive then you can add your own shortcut. Steps to alter the shortcuts are explained further below.
- Select All: If you demand to select everything in a single layer there are two means to become nearly it. You can hover your mouse over the layer y'all wish to select, and so press Ctrl+LeftMouseButton. To brand this process faster you tin instead merely press Ctrl+A and move everything inside that layer. Both piece of work and the only difference between them is that the outset volition select the work itself, while the latter will select the whole canvas, but it'due south withal.
- Deselect: When finished with your pick, you can promptly deselect everything by pressing Ctrl+D!
- Move Layer Tool: When y'all want to move the contents of one or more than layers around, instead of clicking the Motion Tool or the tools tab, you can only press 'K' on your keyboard and now y'all just demand to move everything as you lot wish!
- Hand Tool: Useful for panning through your artwork. If you press 'H', Prune Studio Paint volition modify you lot from any tool you're using to the paw tool. This is not i of my favorite shortcuts though. This implies changing from tool to tool whenever you demand. I pan through my sail a lot! So while drawing, when needing to move around, yous can as well merely press 'Space+LeftButtonMouse and motility around. This makes it much easier since in one case you release this buttons yous're back with whatever tool you lot were working with!
Clip Studio Paint Animation Shortcuts
Animative in Clip Studio Paint is something quite new. I'chiliad not certain if that's the reason why, but the default settings don't actually have any shortcuts jump except for showing the timeline.
If y'all desire to animate in Clip Studio Paint the first thing you demand is the timeline, which should appear when pressing 'X'. In this timeline, almost of the buttons you demand will be shown, but it'southward ever useful to input some shortcuts to make your life easier and speed up some things a bit!

The tabular array below will show the keybinds I similar to apply and experience that make sense. Of grade, you tin use your ain and if you lot're not sure how to change or add a new shortcut in Prune Studio Paint, just become a flake below and I explain how to do it.
Another thing worth mentioning is that some of these hotkeys are already bound to other shortcuts. These are not very used, so it's ok to lose them. However, if it's something yous utilise or prefer to leave it as it is, it'due south ok to choose another keybind for the shortcut. Again, this is just my recommendation and anybody has their preferences then become with whatever you lot feel more comfortable with!
| Shortcut Names | Recommended Keybinds / Hotkeys |
| Timeline Shortcut | X (assigned) or Ctrl+Alt+T (recommended) |
| Enable Onion Peel Shortcut | O |
| New Animation Cell Shortcut | Northward |
| Add Keyframe Shortcut | Ctrl+Yard |
| Adjacent Keyframe Shortcut | Ctrl+50 |
| Previous Keyframe Shortcut | Ctrl+J |
| Copy Keyframe Shortcut | Ctrl+Alt+C |
| Paste Keyframe Shortcut | Ctrl+Alt+V |
| Play/Terminate Animation Shortcut | Ctrl+Alt+P |
| Loop Play | Ctrl+Alt+Fifty |
- Timeline: Every bit I've mentioned this one is the only shortcut already jump in Prune Studio Paint. Although I realized that the 'X' push enters in disharmonize with another shortcut already leap past the software. Irresolute it to something else, similar Ctrl+Alt+T might be a meliorate thought! Alternatively, you can just go to Window -> Timeline. If you breathing a lot, having the timeline showing up at all times is a must, so maybe you don't fifty-fifty need a shortcut for this that badly. All upward to you and what y'all adopt!
- Enable Onion Skin: Onion skin is very useful while animating. I've set up information technology to the 'O' push button on my keyboard since information technology seems pretty intuitive. O for Onion!
- New Animation Cell: If you need a new blitheness prison cell, there'southward a push button for that on the meridian bar of your timeline. Merely, in instance you want to make this process quicker, I recommend setting a shortcut for it, for instance, the 'N' button on your keyboard!
- Add together Keyframe: This is some other activeness that you lot'll use a lot. Adding and moving between keyframes feels similar their shortcuts should exist next to each other, then that's how I set them up. To add a keyframe something like 'Ctrl+One thousand' works very well for me!
- Side by side Keyframe: If I need to move to the adjacent keyframe, I chose a shortcut that'south right after the latter. By pressing 'Ctrl+Fifty' I'll move to the next keyframe right abroad!
- Previous Keyframe: Going back to a previous keyframe, I recommend something closer to the two above, 'Ctrl+J' is what I use and hopefully it will work perfectly for you as well.
- Copy And Paste Keyframe: At that place are no keys assigned to copying and pasting keyframes, unfortunately. Sometimes it'southward pretty useful if you need to merely modify small things from one keyframe to some other. Of course, it depends on how you similar to work. Since copy and paste is a common action while cartoon, I figured that a like shortcut would work well. 'Ctrl+Alt+C' to copy a keyframe and 'Ctrl+Alt+Five' to paste information technology!
- Play Animation: You'll want to play your animation frequently to cheque how it's going and what exercise yous demand to change. Once again a push to play your animation stand correct at the top bar of the timeline. But, I figured a shortcut can come in handy. For that, I used 'Ctrl+Alt+P'.
- Loop Play: This one is not as necessary as the residue, but I even so like to have it. Using a shortcut to loop play will non make the blitheness play right abroad. What happens is that you activate the loop pick. Then, you demand to press play and your animation volition play in a loop. I've set the shortcut equally 'Ctrl+Alt+L'. If you don't want to sentinel your work on loop anymore but printing the shortcut again and it will deactivate it!
How To Change Hotkeys / Shortcuts On Clip Studio Paint
Sometimes Clip Studio won't have shortcuts assigned to sure actions. Others you lot simply don't experience like that's the right shortcut for a tool or an action. You tin change them equally you wish though!
This is very useful since nosotros all have our preferences and like to work in dissimilar ways. To do and so, you just need to go to File -> Shortcut Settings… and a window will pop up! There's actually a huge shortcut you lot can utilize to open up this window: 'Ctrl+Shift+Alt+K'.
Now the tools, deportment, menus and other are divided through categories. To find what you need, you just demand to roam about a bit until you find the shortcut y'all desire to add together or change. When finding it, simply click on information technology and then choose the 'Edit Shortcut' or 'Add Shortcut' button, depending on if you lot're irresolute information technology or adding a new ane.
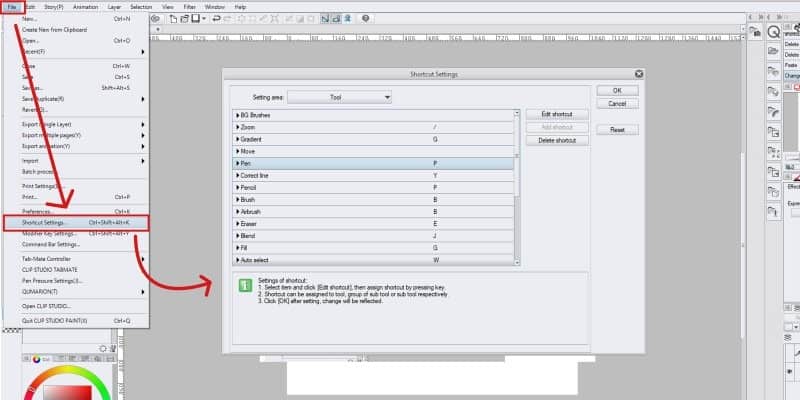
Finally, printing the buttons you wish to bind that shortcut and press 'Enter'. That's it! When you're finished with all the shortcuts, click ok and they should all be assigned.
Note that you can also delete a shortcut if you don't wish to have whatsoever keybind assigned to that specific action. Merely click on it and then the 'Delete Shortcut' button.
Clip Studio Pigment has made it very piece of cake to find and modify shortcuts to your liking and so make utilize of it as much as yous demand!
Related Questions
How do yous flip a canvass in Prune Studio? If yous wish to flip the whole canvas, go to Edit -> Rotate/Invert Sheet and cull one of the options. This does not have a keybind assigned to it, but you tin if it's something you do a lot!
How do y'all select multiple layers in Clip Studio Paint? If yous want to select more than one layer, hold 'Ctrl' while clicking on each layer you lot want to select.
Back to the Blog
Source: https://doncorgi.com/blog/clip-studio-paint-shortcuts/
Posted by: millershorly.blogspot.com
0 Response to "How To Do Camera Zoom In Clip Studio Paint"
Post a Comment